Flake Epoxy

Flake epoxy is also known as decorative flake epoxy is known for not just its beauty but also the safety features it provides. This epoxy coating is great for garages due to its many benefits including stain resistance, impact resistance, and anti-slip properties. This flooring choice can be personalized for you in different ways. You can choose the color of not only the base epoxy but the decorative flakes as well to create different color schemes. You can also choose different size flakes to create more definition on your floor. Even with the added texture of this flooring, it is just as easily cleaned and maintained just as standard epoxy, and will last for 20 years or more.

Benefits of Flake Epoxy Garage Flooring

There are many benefits to flake garage floor epoxy. This flooring choice gives you complete coverage with all the strength and durability that your garage needs. This strong flooring is impact resistant and can withstand the heavy load often found in machinery and the vehicles themselves creating the perfect workspace. If you choose to use your garage as something else like a home gym or man cave this flooring can deliver benefits to this space as well through its personalization and easy maintenance. You can choose many different colors with this flooring including the base epoxy color as well as the flakes. The flakes themselves can be personalized as well with different sizes to give a different dimension to the flooring. This flooring is easily kept clean by simply sweeping and can give added safety through the flakes by having slip-resistance.

Tools and Materials Needed for Flake Epoxy Flooring

While epoxy flooring can be tricky and it is generally recommended that a professional takes care of the installation the tools and materials needed for this installation is the same all around. Whether you choose to hire a professional or take this project on on your own you will have a checklist of tools and materials needed for each step of the job.

Free Quote

Fill out this form and someone from our team will be in touch with you shortly.

    preparation

    Preparation Tools

    The preparation of the surface is incredibly important in the installation process and having the right tools can guarantee the surface is ready for the flake epoxy. Common tools that are needed in the preparation step are a mop, broom, and vacuum. This is to guarantee the surface is completely clean and ready for the installation. You can also find grinders in this step of the process as well as different materials used to fill in cracks and other blemishes to ensure a smooth surface.

    mixing

    Mixing Tools

    There are many tools involved in mixing the epoxy in preparation for installing it. When mixing the epoxy you’ll need different tools such as mixing blades and a variable speed drill. 5 Gallon buckets are used for housing the mixture during the mixing process different quart sizes are used for measuring. You will also find some odds and ends like screwdrivers, timers, and heavy plastic that are actually useful in this process for protection or opening plastic buckets or sandbags.

    installation

    Installation Tools

    There are many different tools that you can find on the site of an epoxy installation site. Common tools found on site are:

    • Roller Cages
    • Squeegees
    • Handles and Replacement Rollers
    • Trowels
    • Extension Cords
    • Spiked Roller
    • Spiked Shoes
    • Blower
    • Gauge Rake
    • Roller Covers
    • Various tapes such as blue tape and duct tape
    • Rags
    • Rubber Gloves
    • Trash Bags
    • Putty Knives 
    • Personal Protective Equipment

    These common items and more are found at the site of flake epoxy flooring to ensure that you are set up for success installing the flake epoxy. While some materials may seem small or trivial, each piece of equipment has a purpose and is important to the installation process.

    Call For a Quote:

    844-482-8330

    The Installation Process of Flake Epoxy Flooring

    Flake epoxy flooring is a beautiful addition to any garage and can give added personalization with different sized flakes and many colors to choose from. Having the proper installation of this flooring is key to its strength and durability. The lifespan of this flooring is directly affected by the installation and making sure it is properly installed so it can be enjoyed for 20 years or more! Explore the installation process of flake epoxy flooring below!
    surface preparation

    Surface Preparation

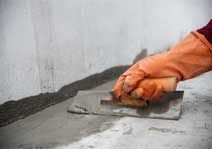
    Preparing the surface for your flake epoxy flooring is incredibly important to guarantee the best epoxy flooring possible. While epoxy can be applied over concrete or wood it is mostly applied over concrete. It is important to first ensure that the surface is clean. This can be done by sweeping and vacuuming to make sure all dirt has been removed. You can even go a step further and mop with water and a mild cleanser but it is important to make sure the floor is completely dried. Next, any blemishes such as cracks need to be repaired to make a smooth surface for the epoxy to be applied on. After this, it’s time to etch the concrete that way any sealant left can be removed and prepare the concrete surface for the epoxy. Finally, give the concrete a final rinse to make sure the surface is ready and allow for the concrete to dry completely.

    flake epoxy installation

    Flake Epoxy Installation

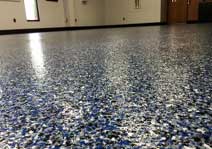
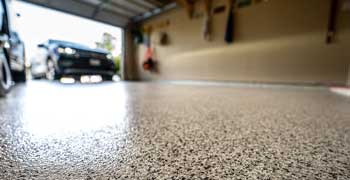
    Now that the surface is completely clean and dried the installation process can begin. The first step in the installation of this beautiful flooring is the epoxy primer coat. This primer penetrates the concrete and acts as a foundation for the thicker epoxy coat to follow. Next, the intermediate epoxy coat is added. This epoxy is rolled on and can be available in many different colors to either match your space or just to personalize your space. After this coat of epoxy is rolled on and the epoxy is still wet, the chips are then broadcast onto the substrate. These chips can vary in both color and size to match your preference. Not only do these chips add color and style but they also play a hand in the traction of your flooring as well as the durability. Once the epoxy has dried the final step is to apply a urethane clear coat. This clear coat not only provides chemical resistance but also makes the surface easier to keep clean.

    Call For a Quote:

    844-482-8330

    perfect contractor

    Finding the Perfect Contractor

    Finding the perfect contractor is important for a flawless flake epoxy flooring for your garage floor. While you may feel confident in installing your own flake epoxy flooring there are many different steps that go into the installation of this flooring and for the maximum durability of this flooring it is important to do each step correctly. Hiring a professional contractor actually saves money in the long run because not only are you guaranteeing that the job is done right but a contractor already has all the necessary tools for creating the perfect flooring. We can provide information on all the available contractors in the area along with reviews and ratings for these contractors so you can find the perfect fit for your garage floor needs. Hiring the perfect contractor includes research of different client reviews, pricing, and scheduling options. Having a contractor complete your installation guarantees that the job is done safely with insurance and knowing that your professional has all the knowledge and experience necessary.

    Let Us Help You!

    Find the perfect flake epoxy contractor in your area today!

    F.A.Q.S

    About Flake Epoxy
    t

    How much does a typical flake epoxy flooring cost?

    The cost of your flake epoxy flooring is dependent on the size of the job as well as the surface preparation. While it doesn’t seem like the current surface should be a price factor, having concrete that needs extensive preparation work can drive up price because of the added steps and labor.
    t

    How long does it take to install a flake epoxy floor?

    The length of the process depends on a few different factors but generally you can expect the process to take around 2-3 days. While the process of installation is done in this time, the surface must be foot traffic free for at least 24 hours and another 5-7 days before vehicle traffic can be present.
    t

    Is a flake epoxy flooring easy to take care of?

    One of the greatest benefits of this flooring is how easily maintained it is! Simply sweeping this surface keeps it looking great which is why seamless floors like this have become increasingly popular. String mops are not recommended on this flooring because it can leave a film but sponge mops and water can be used for an added cleaning step.